Understanding the 12-Volt Tractor Wiring Diagram: Your Electrical Blueprint
Converting your classic tractor from a 6-volt to a 12-volt electrical system is a rewarding project that significantly boosts reliability and performance. However, success hinges on a thorough understanding of the 12-volt tractor wiring diagram. This document, specific to your tractor's make, model, and year, serves as your electrical blueprint. It details every wire's connection, component function, and the overall electrical flow. Working without a precise diagram poses significant risk of electrical damage or even fire. Resources like online forums (1) and original manuals are excellent sources. For additional diagrams, check out this helpful resource: 12-volt conversion guide.
Why is understanding this diagram so crucial? A faulty connection can lead to component failure, reduced performance and potential safety hazards. The diagram acts as a guide to prevent potential costly mistakes.
Choosing the Right Parts: The Foundation of Your Conversion
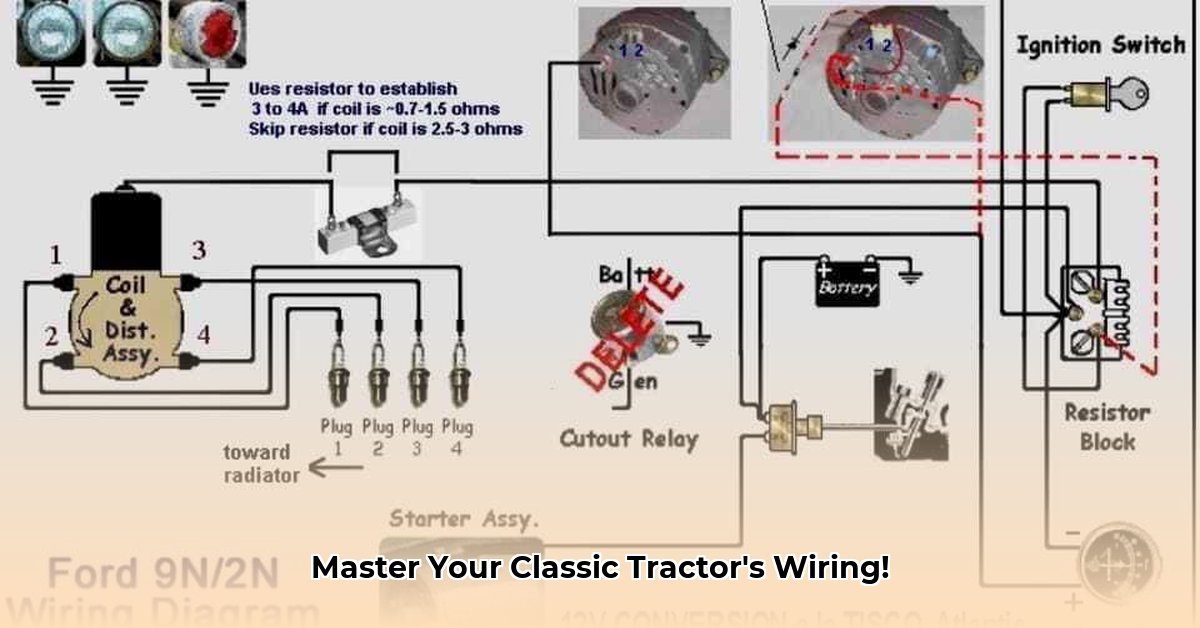
While several parts are important, the alternator is the heart of your 12-volt upgrade. The Delco 10SI alternator is a popular choice due to its reliability and readily available replacement parts. You'll also need a new 12-volt battery for significantly increased power and, depending on your tractor's ignition system, a ballast resistor. This component protects your older ignition coil from the higher 12-volt current, preventing overheating and potential damage.
Did you know that a properly functioning 12-volt system can enhance your tractor's starting power by up to 60%? This directly improves its overall efficiency.
Step-by-Step 12-Volt Conversion: A Practical Guide
This conversion requires careful and methodical execution. This guide provides a framework; always consult your tractor's specific wiring diagram for precise instructions. Safety is paramount throughout the entire process.
1. Safety First: Battery Disconnect: Before beginning any work, disconnect the negative (-) battery terminal. This prevents accidental shorts and electric shock. (Critical for safety).
2. Gather Your Components: Ensure you have all necessary parts: your new alternator, 12-volt battery, wiring, and ballast resistor (if needed). A pre-assembled kit is worthwhile to reduce chance of errors.
3. Mounting the Alternator: Securely install the new 12-volt alternator. This may involve adjustments or custom fabrication depending on your tractor's design. Appropriate pulley size is also crucial for optimal alternator function.
4. Wiring the Alternator: Follow your wiring diagram precisely. Incorrect wiring severely risks damage to the alternator and other components. Take your time and double-check each connection. (Double-check every connection).
5. Battery Installation: Securely mount the new 12-volt battery and connect the positive (+) and negative (-) terminals.
6. Ballast Resistor Connection (If Necessary): If your tractor’s wiring diagram requires a ballast resistor, wire it carefully. This component protects your ignition coil.
7. Pre-Assembly Testing: Before final assembly, thoroughly test all connections using a multimeter to check voltage and amperage. Addressing issues at this stage prevents more significant problems later. (Essential for error prevention).
8. Battery Reconnection: After successful testing, reconnect the negative (-) battery terminal.
9. Final Checks and Adjustments: Start the tractor and monitor the charging system. Ensure proper alternator function and accurate ammeter readings. Listen for any unusual engine sounds. (Crucial for system verification).
Ford vs. Farmall Conversions: Key Differences
While the fundamental conversion steps are similar for Ford and Farmall tractors, significant differences exist in wiring layouts and component placement. Always use the correct wiring diagram for your specific tractor, as using an incorrect diagram can result in serious problems.
Troubleshooting Common Problems
Even with careful work, problems may arise. The following table outlines common issues and solutions:
| Problem | Potential Causes | Troubleshooting Steps |
|---|---|---|
| Alternator Not Charging | Loose connections, broken belt, faulty alternator | Check connections and belt tension; test alternator function |
| Inaccurate Ammeter Readings | Incorrect wiring, faulty ammeter | Verify wiring; replace ammeter if necessary |
| Ignition Problems | Faulty ballast resistor, wiring issue | Check resistor and connections; examine the entire circuit |
Remember, patience and attention to detail are key. A clear wiring diagram is your invaluable guide.